
 Kia Sportage: Intake Actuator: Repair procedures
Kia Sportage Service & Repair Manual (3rd Generation, SL; 2011-2016) / Heating,Ventilation, Air Conditioning / Blower / Intake Actuator: Repair procedures
| Inspection |
| 1. |
Ignition "OFF" |
| 2. |
Disconnect the intake actuator connector. |
| 3. |
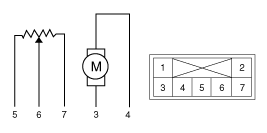
Verify that the actuator operates to the recirculation position when connecting 12V to the terminal 3 and grounding terminal 4. |
| 4. |
Verify that the intake actuator operates to the fresh position when connecting in the reverse.
|
| 5. |
Check the voltage between terminals 6 and 7.
|
| 6. |
If the intake actuator is not operated well, substitute with a known-good intake actuator and check for proper operation. |
| 7. |
If the problem is corrected, replace the intake actuator. |
| Replacement |
| 1. |
Disconnect the negative (-) battery terminal. |
| 2. |
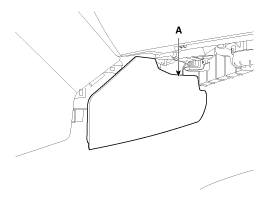
Remove the right extension cover (A).
|
| 3. |
Remove the crash pad.
(Refer to BD group - "Crash Pad") |
| 4. |
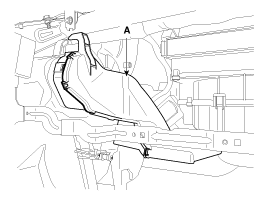
Remove the right shower duct (A).
|
| 5. |
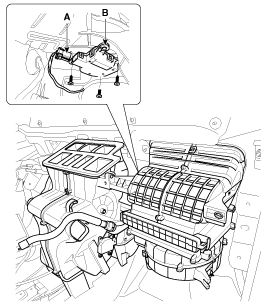
Disconnect the Intake actuator connector (A). |
| 6. |
Loosen the mounting screw and then remove the intake actuator (B).
|
| 7. |
Installation is the reverse order of removal. |
Description
1.
The intake actuator is located at the blower unit.
2.
It regulates the intake door by signal from control unit.
3.
Pressing the intake selection switch will shift between re...
 Intake Actuator: Description and Operation
...
 Controller
See also:
Tyre Pressure Monitoring System (TPMS): If Equipped
Low tyre pressure warning light and TPMS malfunction indicator
Low tyre pressure location indicator, shown on the LCD display
Checking tyre pressure
...
Intelligent Speed Limit Assist malfunction and limitations
Intelligent Speed Limit Assist malfunction
A: Check Driver Assistance system
If ISLA detects a system fault, a warning message appears on the ...
Hands Free Mic: Repair procedures
Inspection
1.
Disconnect the negative(-) battery terminal.
2.
Remove the roof trim.
(Refer to the BD group - "Roof trim")
3.
Remove the handsfree mic (A) after loosening the connector and ...
Categories
- Home
- Kia Sportage NQ5 (2022-2026) Owner's Manual
- Kia Sportage QL (2015-2019) Owner's Manual
- Kia Sportage QL (2015-2019) Service Manual
- Kia Sportage SL 2010-2016 Owner's Manual
- Kia Sportage SL 2010-2016 Service Manual

Copyright © sl.kispmanual.com 2014-2026 - 0.0611