
 Kia Sportage: Seat Belt Pretensioner (BPT): Repair procedures
Kia Sportage Service & Repair Manual (3rd Generation, SL; 2011-2016) / Restraint / Seat Belt Pretensioner / Seat Belt Pretensioner (BPT): Repair procedures
| Removal |
| 1. |
Disconnect the battery negative cable, and wait for at least thirty seconds before beginning work. |
| 2. |
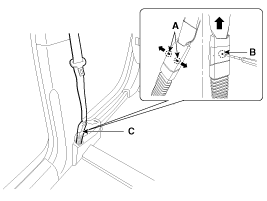
To remove the seat belt anchor pretensioner (C), keep on
pushing the lock pins (A) as arrow direction. And then remove the seat
belt after pushing the lock pin (B).
|
| 3. |
Remove the following parts. (Refer to the Body group- Interior trim)
|
| 4. |
Remove the upper anchor bolt. |
| 5. |
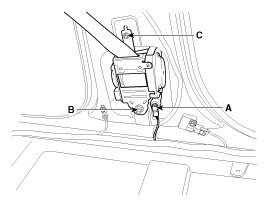
Disconnect the seat belt pretensioner connector (A).
|
| 6. |
Loosen the seat belt pretensioner mounting bolt (B,C) and remove the seat belt pretensioner. |
| Installation |
| 1. |
Remove the ignition key from the vehicle. |
| 2. |
Disconnect the battery negative cable and wait for at least thirty seconds. |
| 3. |
Install the seat belt pretensioner (BPT) with a bolt.
|
| 4. |
Connect the seat belt pretensioner (BPT) connector. |
| 5. |
Install the upper anchor bolts.
|
| 6. |
Install the following parts. . (Refer to the Body group- Interior trim)
|
| 7. |
Insert the seat belt to the anchor pretensioner. |
| 8. |
Reconnect the battery negative cable. |
| 9. |
After installing the seat belt pretensioner (BPT), confirm proper system operation:
|
 Seat Belt Pretensioner (BPT): Components and Components Location
Description
Anchor pretensioner operates as well as belt Pretensioner at
the same time If it gets into its deploy condition after a collision. It
is located at near anchor on front seat and it ...
 Anchor Pretensioner: Description and Operation
See also:
Schematic Diagrams
Schematic Diagram
...
Electrochromic Mirror (ECM)
The electric rearview mirror automatically controls the glare from the headlights
of the vehicles behind you in nighttime or low light driving conditions. The sensor
mounted in the mirror senses t ...
Rear Bumper: Components and Components Location
Components
1. Front bumper cover2. Front bumper side bracket [RH]3. Front bumper side bracket [LH]
...
Categories
- Home
- Kia Sportage NQ5 (2022-2026) Owner's Manual
- Kia Sportage QL (2015-2019) Owner's Manual
- Kia Sportage QL (2015-2019) Service Manual
- Kia Sportage SL 2010-2016 Owner's Manual
- Kia Sportage SL 2010-2016 Service Manual

Copyright © sl.kispmanual.com 2014-2026 - 0.0706