
 Kia Sportage: Battery: Repair procedures
Kia Sportage Service & Repair Manual (3rd Generation, SL; 2011-2016) / Engine Electrical System / Charging System / Battery: Repair procedures
| Removal and Installation |
| 1. |
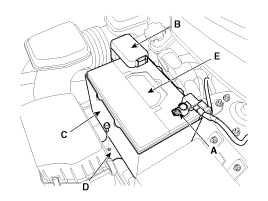
Remove the battery.
|
| 2. |
Remove the air duct and air cleaner assembly. (Refer to EM group). |
| 3. |
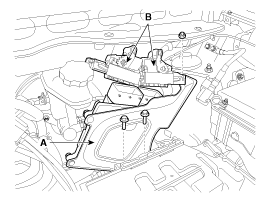
Remove the ECM (A) after disconnecting the connectors (B). (Refer to FL group)
|
| 4. |
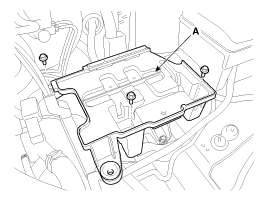
Remove the battery tray (A).
|
| 5. |
Installation is the reverse order of removal.
|

| Inspection |
Battery Diagnostic Flow
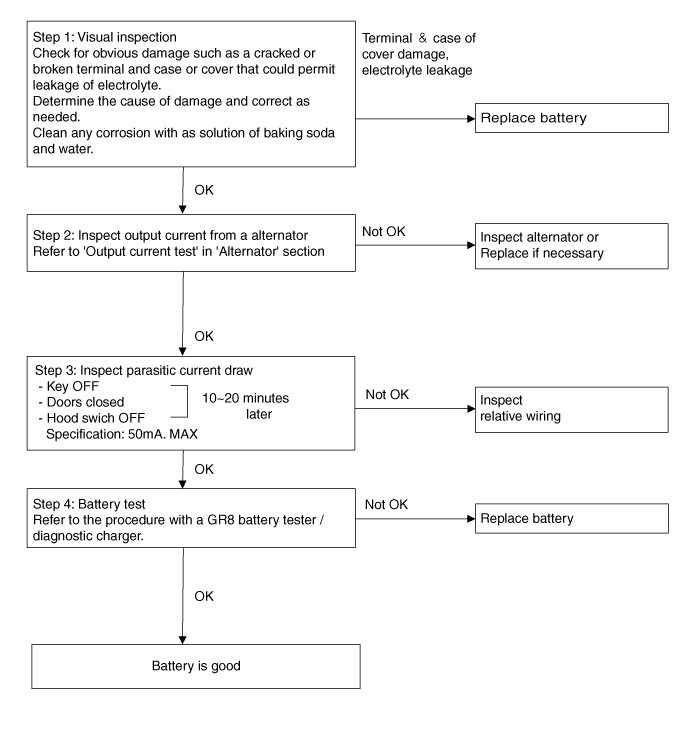
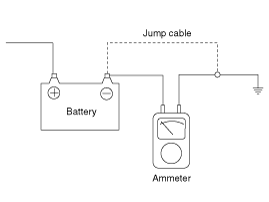
Vehicle parasitic current inspection
| 1. |
Turn the all electric devices OFF, and then turn the ignition switch OFF. |
| 2. |
Close all doors except the engine hood, and then lock all doors.
|
| 3. |
Wait a few minutes until the vehicle’s electrical systems go to sleep mode.
|

| 4. |
Connect an ammeter in series between the battery (-) terminal
and the ground cable, and then disconnect the clamp from the battery
(-) terminal slowly.
|
| 5. |
Read the current value of the ammeter.
|
| Cleaning |
| 1. |
Make sure the ignition switch and all accessories are in the OFF position. |
| 2. |
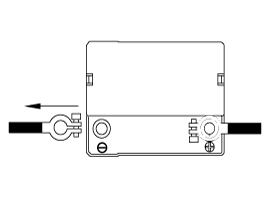
Disconnect the battery cables (negative first). |
| 3. |
Remove the battery from the vehicle.
|
| 4. |
Inspect the battery tray for damage caused by the loss of
electrolyte. If acid damage is present, it will be necessary to clean
the area with a solution of clean warm water and baking soda. Scrub the
area with a stiff brush and wipe off with a cloth moistened with baking
soda and water. |
| 5. |
Clean the top of the battery with the same solution as described above. |
| 6. |
Inspect the battery case and cover for cracks. If cracks are present, the battery must be replaced. |
| 7. |
Clean the battery posts with a suitable battery post tool. |
| 8. |
Clean the inside surface of the terminal clamps with a
suitable battery cleaning tool. Replace damaged or frayed cables and
broken terminal clamps. |
| 9. |
Install the battery in the vehicle. |
| 10. |
Connect the cable terminals to the battery post, making sure tops of the terminals are flush with the tops of the posts. |
| 11. |
Tighten the terminal nuts securely. |
| 12. |
Coat all connections with light mineral grease after tightening.
|
Components
1. Battery insulation pad2. Battery3. Battery tray4. ECM & bracket assembly5. Battery mounting bracket...
 Battery: Components and Components Location
Description
Vehicles have many control units that use more electricity.
These units control their own system based on information from diverse
sensors. It is important to have a stable power su...
 Battery Sensor: Description and Operation
See also:
Rear Glass Defogger Printed Heater: Repair procedures
Inspection
Wrap tin foil around the end of the voltmeter test lead to
prevent damaging the heater line. Apply finger pressure on the tin foil,
moving the tin foil a ...
Front Wheel Transfer Assembly: Repair procedures
Removal
It is not recommended to overhaul the transfer assembly
because a special three-dimensional measuring instrument is required to
determine the sizes of the t ...
Changing Tyres
Procedure
Move the Kia Sportage to a safe, level place away from traffic and stop it.
Switch on the haza ...
Categories
- Home
- Kia Sportage NQ5 (2022-2026) Owner's Manual
- Kia Sportage QL (2015-2019) Owner's Manual
- Kia Sportage QL (2015-2019) Service Manual
- Kia Sportage SL 2010-2016 Owner's Manual
- Kia Sportage SL 2010-2016 Service Manual

Copyright © sl.kispmanual.com 2014-2026 - 0.0741