
 Kia Sportage: Front Disc Brake: Repair procedures
Kia Sportage Service & Repair Manual (3rd Generation, SL; 2011-2016) / Brake System / Brake System / Front Disc Brake: Repair procedures
| Removal |
| 1. |
Remove the front wheel & tire.
|
| 2. |
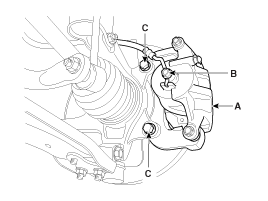
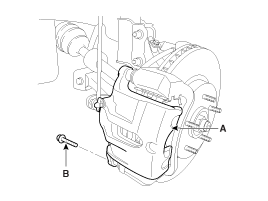
Loosen the hose eyebolt (B) and caliper mounting bolts (C), then remove the front caliper assembly (A).
|
| 3. |
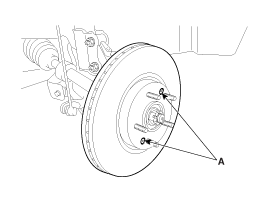
Remove the front brake disc by loosening the screws (A).
|
| Replacement |
Front brake pads
| 1. |
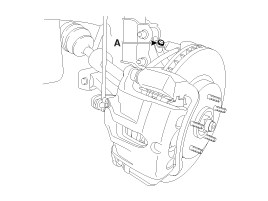
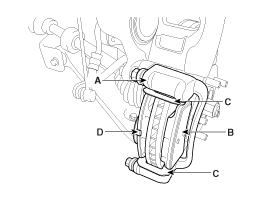
Remove the brake hose mounting bracket bolt (A).
|
| 2. |
Loosen the guide rod bolt (B) and pivot the caliper (A) up out of the way.
|
| 3. |
Replace pad shim (D), pad retainers (C) and brake pads (B) in the caliper bracket (A).
|
| Inspection |
Front brake disc thickness check
| 1. |
Check the brake pads for wear and fade. |
| 2. |
Check the brake disc for damage and cracks. |
| 3. |
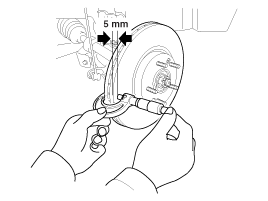
Remove all rust and contamination from the surface, and
measure the disc thickness at 8 points, at least, of same distance (5mm)
from the brake disc outer circle.
|
| 4. |
If wear exceeds the limit, replace the discs and pad assembly left and right of the vehicle. |
Front Brake Pad Check
| 1. |
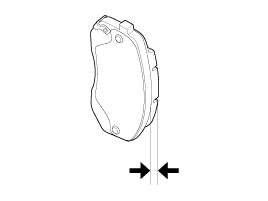
Check the pad wear. Measure the pad thickness and replace it, if it is less than the specified value.
|
| 2. |
Check that grease is applied, to sliding contact points and the pad and backing metal for damage.
|
Front brake disc runout check
| 1. |
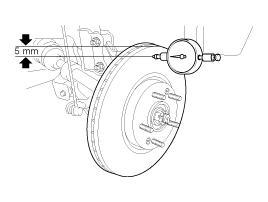
Place a dial gauge about 5mm (0.2 in.) from the outer circumference of the brake disc, and measure the runout of the disc.
|
| 2. |
If the runout of the brake disc exceeds the limit specification, replace the disc, and then measure the runout again. |
| 3. |
If the runout does not exceed the limit specification,
install the brake disc after turning it 180° and then check the runout
of the brake disc again. |
| 4. |
If the runout cannot be corrected by changing the position of the brake disc, replace the brake disc. |
| Installation |
| 1. |
Installation is the reverse of removal. |
| 2. |
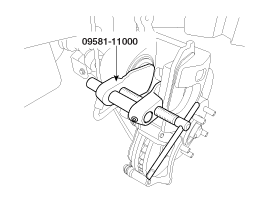
Use a SST (09581-11000) when installing the brake caliper assembly.
|
| 3. |
After installation, bleed the brake system. (Refer to Brake system bleeding) |
Components
1. Guide rod bolt2. Bleed screw3. Caliper bracket 4. Caliper body5. Inner pad shim6. Brake pad7. Pad retainer...
 Front Disc Brake: Components and Components Location
Components
1. Guide rod bolt2. Bleed screw3. Caliper bracket4. Caliper body5. Inner pad shim6. Brake pad7. Pad retainer...
 Rear Disc Brake: Components and Components Location
See also:
Manifold Absolute Pressure Sensor (MAPS): Specifications
Specification
Pressure[kPa (kgf/cm?, psi)]Output Voltage (V)20.0 (0.20, 2.9)0.7946.7 (0.47, 6.77)1.84101.3 (1.03, 14.7)4.0
...
Rear Bumper: Repair procedures
Replacement
•
Put on gloves to protect your hands.
•
Use a plastic panel removal tool to remove interior trip pieces to without marring the surface ...
Theft-alarm stage
The alarm will be activated if any of the following occurs while the system is
armed.
A front or rear door is opened without using the ignition key or transmitter
(or smart key).
The tailga ...
Categories
- Home
- Kia Sportage NQ5 (2022-2026) Owner's Manual
- Kia Sportage QL (2015-2019) Owner's Manual
- Kia Sportage QL (2015-2019) Service Manual
- Kia Sportage SL 2010-2016 Owner's Manual
- Kia Sportage SL 2010-2016 Service Manual

Copyright © sl.kispmanual.com 2014-2026 - 0.0622