
 Kia Sportage: Front Washer Motor: Repair procedures
Kia Sportage Service & Repair Manual (3rd Generation, SL; 2011-2016) / Body Electrical System / Windshield Wiper/Washer / Front Washer Motor: Repair procedures
| Inspection |
Front Washer Motor
| 1. |
With the washer motor connected to the reservoir tank, fill the reservoir tank with washer fluid.
|

| 2. |
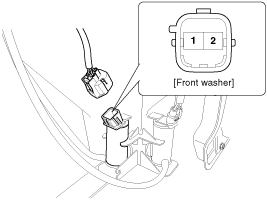
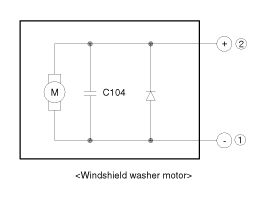
Connect positive (+) battery cables to terminal 1 and negative (-) battery cables to terminal 2 respectively. |
| 3. |
Check that the motor operates normally and the washer motor runs and water sprays from the front nozzles. |
| 4. |
If they are abnormal, replace the washer motor.
|
| Removal |
|

| 1. |
Disconnect the negative (-) battery terminal. |
| 2. |
Remove the front bumper cover.
(Refer to the BD group - "Front bumper") |
| 3. |
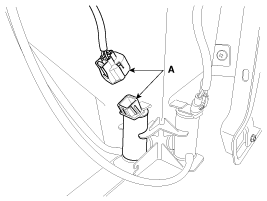
Remove the front washer motor connector (A).
|
| 4. |
Remove the rear washer motor connector (A).
|
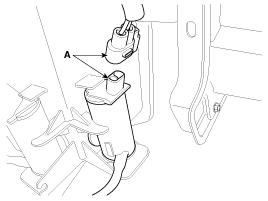
| 5. |
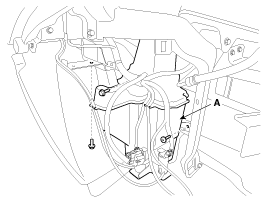
Remove the washer hose, the front washer motor and the rear washer motor. |
| 6. |
Remove the washer reservoir (A) after removing 3 bolts.
|
| Installation |
| 1. |
Reassemble the washer reservoir.
|
| 2. |
Connect the washer motor connectors and washer hoses. |
| 3. |
Install the front and rear washer motor. |
| 4. |
Install the front and rear washer nozzle.
|
| 5. |
Install the front bumper cover. |
| 6. |
Refill the washer fluid. |
Removal
1.
Remove the windshield wiper arm and blade after removing a nut (B) and wiper cap (A).
2.
Remove the windshield wiper arm and blade (A).
3.
If necessary, release the wiper blade ...
 Front Wiper Motor: Repair procedures
Circuit Diagram...
 Rain Sensor: Schematic Diagrams
See also:
Fuses
A vehicle’s electrical system is protected from electrical overload damage by
fuses.
This vehicle has 3 fuse panels, one located in the driver’s side panel bolster,
the other in the engine ...
Lean NOx Trap
The Lean NOx Trap (LNT) system reduces nitrogen oxides in the exhaust. Fuel quality can affect exhaust odour and
reduce the system’s ability to control NOx emissions. Use regulated automotive die ...
Using the Remote Key (If Equipped)
Lock button
Unlock button
Tailgate unlock button and tailgate op ...
Categories
- Home
- Kia Sportage NQ5 (2022-2026) Owner's Manual
- Kia Sportage QL (2015-2019) Owner's Manual
- Kia Sportage QL (2015-2019) Service Manual
- Kia Sportage SL 2010-2016 Owner's Manual
- Kia Sportage SL 2010-2016 Service Manual

Copyright © sl.kispmanual.com 2014-2026 - 0.0557