
 Kia Sportage: Side Impact Sensor (SIS): Repair procedures
Kia Sportage Service & Repair Manual (3rd Generation, SL; 2011-2016) / Restraint / SRSCM / Side Impact Sensor (SIS): Repair procedures
| Removal |
| Pressure Side Impact Sensor |
|

| 1. |
Disconnect the battery negative cable, and wait for at least three minutes before beginning work. |
| 2. |
Remove the front door trim. (Refer to the Body group- Front door) |
| 3. |
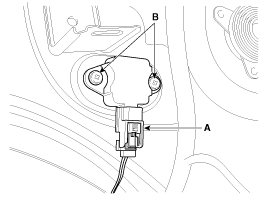
Disconnect the front side impact sensor connector (A) and remove the front side impact sensor mounting screws (B).
|
| 4. |
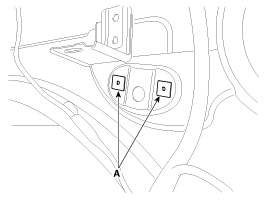
Remove the screw grommets (A).
|
Side Impact Sensor
| 1. |
Disconnect the battery negative cable and wait for at least three minutes before beginning work. |
| 2. |
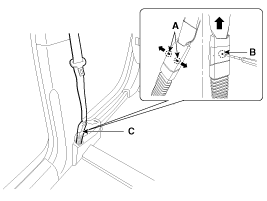
To remove the seat belt anchor pretensioner (C), keep on
pushing the lock pins (A) as arrow direction. And then remove the seat
belt after pushing the lock pin (B).
|
| 3. |
Remove the door scuff trim. (Refer to the Body group - Interior trim) |
| 4. |
Remove the center pillar trim. (Refer to the Body group - Interior trim) |
| 5. |
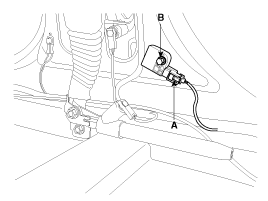
Disconnect the side impact sensor connector (A).
|
| 6. |
Loosen the side impact sensor mounting bolt (B) and remove the side impact sensor. |
| Installation |
| Pressure Side Impact Sensor |
|
| 1. |
Install the screw grommets (A).
|
| 2. |
Install the new front side impact sensor with the screws then connect the pressure side impact sensor connector.
|
| 3. |
Install the front door trim. (Refer to the Body group- Front door) |
| 4. |
Insert the seat belt to the anchor pretensioner.
|

| 5. |
Reconnect the battery negative cable. |
| 6. |
After installing the front side impact sensor, confirm proper system operation:
|
Side Impact Sensor
|
| 1. |
Install the new side impact sensor with the bolt then connect the side impact sensor connector.
|
| 2. |
Install the center pillar trim (Refer to the Body group - Interior tirm) |
| 3. |
Install the door scuff trim. (Refer to the Body group - Interior tirm) |
| 4. |
Insert the seat belt to the anchor pretensioner. |
| 5. |
Reconnect the battery negative cable. |
| 6. |
After installing the Side Impact Sensor, confirm proper system operation:
|
 Side Impact Sensor (SIS): Components and Components Location
Description
The SRSCM shall monitor the status of the driver and front
passenger seat belt buckle. The SRSCM provides one pin each for the
driver and front passenger seat belt buckle status inp...
 Seat Belt Buckle Switch (BS): Description and Operation
See also:
ACC(Accessory)
Orange indicator
• With automatic transaxle
Press the ENGINE START/STOP button while it is in the OFF position without depressing
the brake pedal.
If the ENGINE START/STOP button is in the AC ...
CVVT Oil Temperature Sensor (OTS): Description and Operation
Description
Continuous Variable Valve Timing (CVVT) system advances or
retards the valve timing of the intake and exhaust valve in accordance
with the ECM control signal which is calculated by ...
Windshield Deicer Switch: Repair procedures
Removal
1.
Disconnect the negative (-) battery terminal.
2.
Remove the center fascia panel.
(Refer to BE - "Audio")
3.
Remove the heater and A/C controller (A) after disconnecting the con ...
Categories
- Home
- Kia Sportage NQ5 (2022-2026) Owner's Manual
- Kia Sportage QL (2015-2019) Owner's Manual
- Kia Sportage QL (2015-2019) Service Manual
- Kia Sportage SL 2010-2016 Owner's Manual
- Kia Sportage SL 2010-2016 Service Manual

Copyright © sl.kispmanual.com 2014-2026 - 0.0619