
 Kia Sportage: Overdrive Clutch Control Solenoid Valve(OD/C_VFS): Repair procedures
Kia Sportage Service & Repair Manual (3rd Generation, SL; 2011-2016) / Automatic Transaxle System / Automatic Transaxle Control System / Overdrive Clutch Control Solenoid Valve(OD/C_VFS): Repair procedures
| Inspection |
| 1. |
Turn ignition switch OFF. |
| 2. |
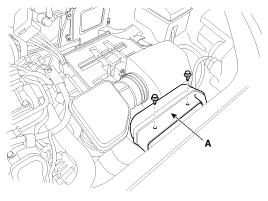
Remove the air duct (A).
|
| 3. |
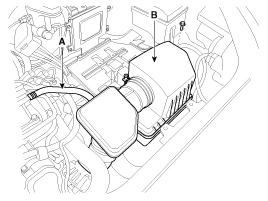
Remove the air cleaner assembly.
|
| 4. |
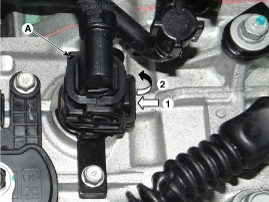
Disconnect the solenoid valve connector (A).
|
| 5. |
Measure resistance between sensor signal terminal and ground terminal. |
| 6. |
Check that the resistance is within the specification. |
| Removal |
Replacing an on/off solenoid valve (SS-A, SS-B) does not
require additional hydraulic pressure adjustment; however, the hydraulic
pressure will need to be adjusted after replacing the VFS solenoid
valve. If replacing the VFS solenoid valve; also replace the valve body
assembly.
(Refer to "Valve Body" in Hydraulic System of this group) |

Circuit Diagram...
 Overdrive Clutch Control Solenoid Valve(OD/C_VFS): Schematic Diagrams
Description
SS-A solenoid valve is attached to the valve body and is an on/off solenoid valve that is used to change gears.
SS-A Solenoid valve(ON/OFF) is installed at valve body....
 SS-A Solenoid Valve(ON/OFF): Description and Operation
See also:
Bulb wattage
...
Power Seat Motor: Repair procedures
Inspection
Power Seat Motor
1.
Remove the front seat.
(Refer to BD group - "Front seat")
2.
Disconnect the connectors for each motor.
3.
With the battery connected directly to the motor ...
Rheostat: Repair procedures
Inspection
1.
Disconnect the negative (-) battery terminal.
2.
Remove the crash pad lower panel.
(Refer to the BD group - "Crash pad")
3.
Remove the crash pad side switch assembly (A) af ...
Categories
- Home
- Kia Sportage NQ5 (2022-2026) Owner's Manual
- Kia Sportage QL (2015-2019) Owner's Manual
- Kia Sportage QL (2015-2019) Service Manual
- Kia Sportage SL 2010-2016 Owner's Manual
- Kia Sportage SL 2010-2016 Service Manual

Copyright © sl.kispmanual.com 2014-2026 - 0.0539